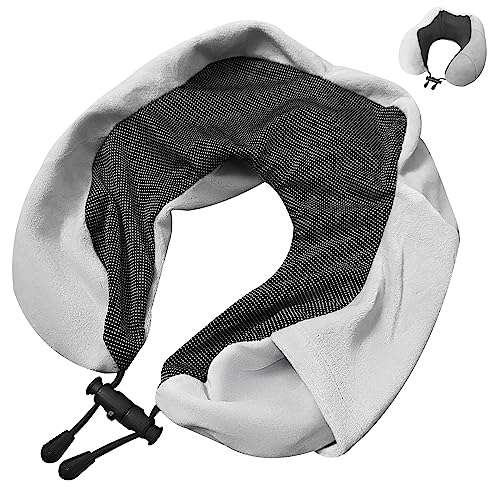
DIY Travel Pillow Covers: Personalize Your Comfort for Unique Adventures
Welcome to the world of DIY travel pillow covers, where comfort meets creativity! Have you ever found yourself on a long journey, desperately needing some extra support for your weary head? Or perhaps you've grown tired of generic and boring travel pillows that lack personality. Well, look no further because we have the perfect solution for you custom made travel pillow covers that will not only provide ultimate comfort but also add a touch of personal style to your adventures.
In this blog post, we'll show you how to create your own travel pillow covers from scratch. Whether you're an experienced seamstress or just starting out with a needle and thread, we'll guide you through the process step by step. So grab your sewing kit and let's dive into the wonderful world of DIY travel pillow covers!
Why Make Your Own Travel Pillow Covers?
-
Personalization: Making your own travel pillow covers allows you to express your unique style and personality. Instead of settling for generic designs, you can choose fabrics that reflect your taste and create a one-of-a-kind look.
2. Comfort: We all know how important comfort is during those long flights or road trips. By creating your own travel pillow covers, you have complete control over the materials used and the level of cushioning provided. You can tailor the cover to perfectly fit your favorite pillow, ensuring maximum comfort every time you use it.
3. Hygiene: Let's face it traveling can be dirty business! Having a removable and washable travel pillow cover means that you can keep it clean and fresh no matter where your adventures take you.
4. Cost-Effective: Buying pre-made travel pillows with fancy covers can often be expensive. By making your own covers, not only do you save money on purchasing new pillows but also get the satisfaction of knowing that your creation is uniquely yours.
5. Eco-Friendly: DIY travel pillow covers allow you to reduce waste by reusing old pillows instead of buying new ones each time they wear out or lose their appeal.
So why settle for plain and impersonal when you can add a touch of creativity and comfort to every journey? Let's dive into the exciting world of DIY travel pillow covers!
DIY Travel Pillow Covers: Materials You'll Need
When it comes to making your own travel pillow covers, having the right materials is key. Here are a few essentials you'll need to get started on your DIY adventure.
First and foremost, you'll need fabric. Look for a material that is soft and comfortable against your skin, such as cotton or flannel. Make sure to choose a fabric that is easy to clean and care for, as travel pillows can often get dirty during your journeys.
Next, gather some thread in coordinating colors. This will be used to sew the seams of your pillow cover and ensure that it stays together securely.
You'll also need some basic sewing supplies, including scissors for cutting out your fabric pieces and pins to hold everything in place while you sew. A sewing machine can make the job quicker and easier, but if you don't have one, don't worry - hand-sewing works just as well!
Consider adding some extra touches to personalize your travel pillow cover. This could include decorative trims or buttons that add a unique flair.
With these materials on hand, you're ready to dive into creating custom travel pillow covers that reflect your personal style and provide ultimate comfort throughout all of your adventures!
How to Make a Travel Pillow Cover: The Basic Steps
When it comes to making your own travel pillow cover, the process is surprisingly simple and can be a fun DIY project. Just follow these basic steps and you'll have a personalized travel pillow cover in no time!
First, gather your materials. You'll need fabric of your choice, scissors, pins or clips, thread, a sewing machine (or needle if hand-sewing), and any additional decorations or embellishments you want to add.
Next, measure and cut your fabric to the desired size for your pillow cover. Be sure to leave extra room for seam allowances. If you're using patterned fabric, make sure to align the pattern how you want it before cutting.
Once you have your pieces cut out, pin or clip them together with right sides facing each other. This will ensure that when you flip it right side out later on, the seams will be hidden.
Now it's time to sew! Using a straight stitch on your sewing machine (or hand-stitching with small even stitches), sew along the edges of the pinned pieces. Leave an opening large enough for inserting the pillow form.
After sewing all around the edges except for the opening, trim any excess fabric and clip corners diagonally to reduce bulk when turning right side out.
Carefully turn everything right side out through the opening and use a pencil or similar tool to push out corners for crisp edges.
Insert your pillow form through the opening and hand-stitch or use a narrow zigzag stitch on your sewing machine to close up the remaining opening.
And there you have it - a custom-made travel pillow cover that reflects both comfort and personal style! So why settle for generic pillows when you can create something unique that adds personality to every journey? Let creativity guide you as you explore different fabrics,textures,and patterns from around world
Tips for Sewing a Custom Travel Pillow Cover
1. Choose the Right Fabric: When it comes to sewing your own travel pillow cover, selecting the right fabric is crucial. Look for materials that are soft, durable, and easy to clean. Consider using cotton or flannel for a cozy feel, or opt for waterproof or stain-resistant fabrics if you anticipate spills or messes during your travels.
2. Measure Twice, Cut Once: Before cutting into your chosen fabric, take accurate measurements of your travel pillow. This ensures a snug fit and prevents any excess fabric from causing discomfort while sleeping on the go.
3. Use a Serger or Zigzag Stitch: To prevent fraying along the edges of your travel pillow cover, consider using a serger machine or zigzag stitch when sewing the seams together. This not only adds durability but also gives your DIY creation a professional finish.
4. Add Fasteners: Depending on personal preference and convenience, you may want to add fasteners such as buttons, Velcro strips, or zippers to secure the opening of your travel pillow cover. These additions ensure that your cover stays in place even during bumpy rides.
5. Get Creative with Embellishments: Don't be afraid to get creative with embellishments! Add decorative elements like embroidery designs, appliques patches, or personalized labels to give your custom travel pillow cover an extra touch of personality and style.
Remember that making mistakes is part of the learning process when it comes to sewing projects embrace them as opportunities for growth and improvement! With these tips in mind, you'll be well on your way to creating unique and comfortable travel pillow covers that reflect both practicality and creativity
Finishing Touches for a Customized Look
When it comes to creating your own travel pillow covers, the possibilities are endless. One of the best ways to add that personal touch and make it truly unique is by adding some finishing touches.
Consider adding decorative trims or ribbons along the edges of your pillow cover. This can instantly elevate its look and give it a more polished finish. You can choose from a wide range of options such as lace, pompoms, or even sequins depending on your style preference.
Another way to customize your travel pillow cover is by incorporating embroidery or appliqué designs. Whether you want to stitch your initials, favorite quotes, or cute travel-related motifs, this will add an extra level of personalization and character.
If you're feeling adventurous, why not experiment with different fabric textures? Opt for soft velvet or faux fur for a luxurious feel during those long journeys. Alternatively, try using patterned fabrics that reflect your personality and taste.
Don't forget about closures! Consider adding buttons or snaps instead of traditional zippers for added flair. Not only do they serve a functional purpose but they also contribute to the overall aesthetic appeal.
Remember that these finishing touches are all about expressing yourself and making your travel pillow cover one-of-a-kind. Get creative and have fun experimenting with different elements until you achieve the perfect customized look!
By paying attention to these small details in the DIY process of making travel pillow covers will ensure that each piece reflects who you are while providing comfort throughout all of life's adventures
In today's fast-paced world, personalization is key to creating unique and memorable experiences. So why not extend that philosophy to your travel essentials? With DIY travel pillow covers, you can add a touch of individuality and comfort to your adventures.
By making your own travel pillow covers, you have the freedom to choose fabrics that reflect your personal style and preferences. Whether it's a bold pattern or a soft texture, you can create something that truly speaks to you. Plus, by customizing the size and shape of the cover, you can ensure maximum comfort during those long journeys.
The materials needed for this project are easily accessible and affordable. From fabric stores to online retailers, there are plenty of options available for every budget. And with just a few basic sewing skills and some creativity, you'll be able to whip up beautiful pillow covers in no time.
When it comes to actually making the travel pillow cover, following simple steps will guide you through the process. From measuring the dimensions of your existing pillow to sewing together the pieces of fabric, each step is straightforward and easy-to-follow.
To make sure your DIY project turns out perfectly, we've also provided some handy tips along the way. These tips include using pins or clips when sewing slippery fabrics, double-checking measurements before cutting any fabric pieces,and taking breaks if needed so as not rush through any steps.
And finally,don't forget those finishing touches! Adding decorative elements like buttons or trimmings can elevate your custom-made travel pillow cover from ordinary to extraordinary.
It's all about adding those special details that make it uniquely yours!
So go ahead personalize your comfort with DIY travel pillow covers! Whether you're embarking on an epic road trip or jetting off on an international adventure, you'll be able relax in style with a one-of-a-kind accessory designed just for you
Frequently Asked Questions (FAQs)
Can I wash my DIY travel pillow cover?
Yes, most DIY travel pillow covers are machine washable. Be sure to check the care instructions for your chosen fabric.
Do I need advanced sewing skills to make a DIY travel pillow cover?
No, basic sewing skills are sufficient for this project. There are many simple designs you can choose from.
How can I remove stains from my DIY travel pillow cover?
Stains can often be removed by spot cleaning with a gentle detergent. Always check the care instructions for your fabric.
Can I use my DIY travel pillow cover as a regular pillowcase?
Certainly! DIY travel pillow covers can also be used as regular pillowcases, adding a touch of your unique style to your bedroom.
What if my travel pillow has an unusual shape?
You can create a custom pattern by tracing your travel pillow's shape onto paper before cutting the fabric.
Is this a cost-effective project?
Yes, making your DIY travel pillow cover is a cost-effective way to personalize your comfort.


